Sony Xperia Flashtool and driver
Download and install Flashtool
C4 and C5 users please do not flash using Flashtool. It will brick the device. M5 users please do use FSC when flashing or it will brick your device.
One of the primary reasons people encounter problems in flashing their device is due to not installing the correct drivers on their computer. Please ensure that drivers for your Sony Xperia device and Flashtool software are correctly installed on your PC before attempting to install new software.
Install drivers for your Sony Xperia
You need to ensure that your PC has all of the necessary drivers installed for your Sony Xperia device. The best way to do this is to install
Make sure you connect your Xperia to the PC before starting the process to download the necessary USB and ADB drivers. The best way to do this is to power off your Sony Xperia and then connect to your PC whilst holding the volume down button.
Install Flashtool drivers from the following location: ‘C:\Flashtool\drivers’. Tick the “Flashmode Drivers” and “Fastboot Drivers” to install.

Note: To install the Flashtool drivers for Windows 8/8.1/10, please follow the steps below.
A) Press the Windows key + R together and in the ‘Run’ box type: shutdown.exe /r /o /f /t 00
– Now make the following selections to boot into the Start Up Setting Screen: Troubleshoot > Advanced options > Start Up Settings > Restart
– Then, when the machine restarts, select number 7 i.e. “Disable driver signature enforcement”. Your machine will start with Driver signing enforcement disabled until the next reboot.
B) Now you can install the Flashtool drivers.
– Windows will warn that the driver is not signed and will require you to confirm the installation.
– Once the installation is complete, reboot the machine
3) Enable “USB debugging” and “Unknown sources” on your Sony Xperia device
‘USB debugging’: Settings > Developer options
‘Unknown sources’: Settings > Security
Part 2: Create your FTF firmware file
You will need a FTF firmware file to install new software onto your device. The following section explains how to create your own FTF firmware file, however if you have downloaded a FTF file from the Firmware Resource section of our website or elsewhere, you can skip this step and proceed to part 3.
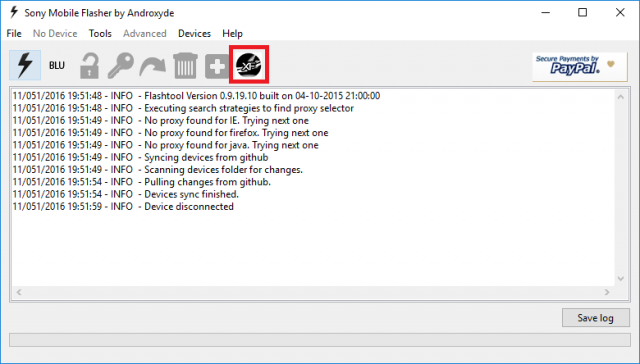
To create your FTF firmware file, you will first need to launch Flashtool and then click on the XperiFirm icon as highlighted below.
You should now see the XperiFirm software launch into a new window. Navigate to your handset on the left pane. You can then choose the firmware for your region/carrier in the middle pane. The pane on the right side will show you which firmware is available for that region. Click on it to download the file.
Important: Only download firmware for your model and variant number. For example, if you own an Xperia Z5 (E6653), only browse and download the firmware builds listed under E6653.

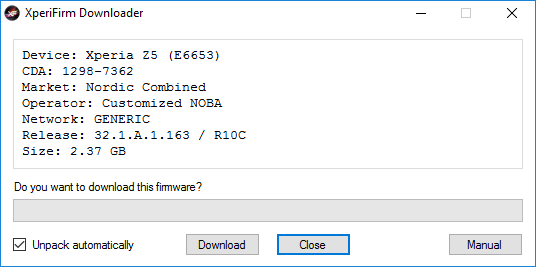
Once clicked, you are asked to confirm whether you want to download the firmware. Ensure that “Unpack automatically” is ticked and then click “Download” to proceed.
Once complete, you will see the following pop message “Unpacked Successfully!” Click OK.

The same “Unpacked successfully!” message will appear on the download dialog. Click “Close” to proceed to the next step.

You will now revert back to Flashtool, which will start creating your FTF firmware file.

Once you see “Torrent file creation finished” then your FTF firmware file has been successfully created.

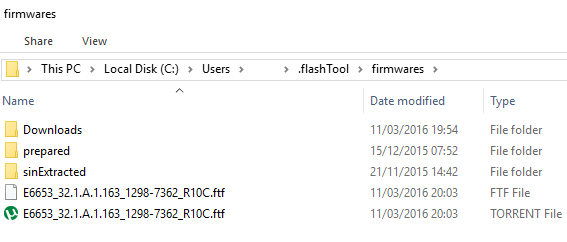
To ensure the FTF firmware file has been created, navigate to the following location on your PC: “C:\Users\[Your PC Name]\.flashTool\firmwares”
Part 3: Flash your FTF firmware file
This section details the steps needed in order to flash new firmware onto your Sony Xperia device.
First of all, open Flashtool and then click on the lightning bolt in the top left of Flashtool as highlighted below.

Select “Flashmode” and click “OK”.

You should already be in the source folder where the FTF firmware files are located. If not, navigate to: “C:\Users\[Your PC Name]\.flashTool\firmwares”
Select the firmware build version that you want to flash from the “Firmware” pane. Ensure the device variant is the same as the model number of your Sony Xperia device.
If you want to retain your apps, data and media (photos, videos, music), then ensure that the “USERDATA” option within the “Wipe” pane is unticked. However, we recommend that when upgrading a major new Android version, a clean install is the way to go. In this case, tick all options under the “Wipe” pane. This will wipe all of your data though including your photos and videos, so please ensure you have these backed up elsewhere.

IMPORTANT – For FlashTool 0.9.19.10 and older: If you skipped Part 2 of the guide as you already had your own FTF firmware file, then you may see the following ‘SIMLOCK’ option ticked under the “MiscTA Exclude” pane. DO NOT untick SIMLOCK as it could lead to problems with the network lock on your device.

IMPORTANT – For FlashTool versions 0.9.22.0 to 0.9.22.2: The developer has changed the meaning of the tick box in newer versions of Flashtool, which means ticking the box includes “SIMLOCK”. Either way, you want to ensure you are NOT including SIMLOCK when flashing firmware. So to be clear, when presented with the “SIMLOCK” option below, you must NOT tick the box.

NOTE – For FlashTool 0.9.22.3 onwards: The developer has disabled “SIMLOCK”, which means you no longer have to worry about accidentally including it in your firmware flashing. The option is only enabled by entering ‘Pro’ mode. Unless you know what you are doing, then stay well away from Pro mode.
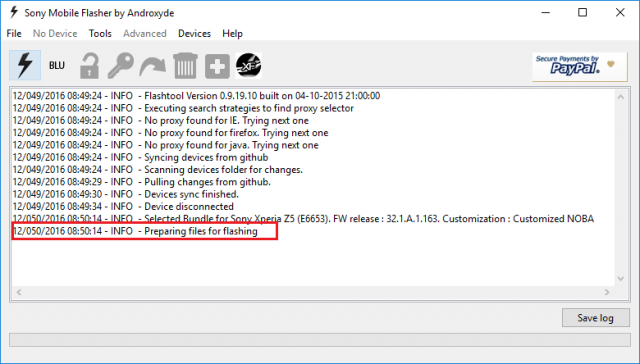
Click “Flash”. Flashtool will then indicate that it is “preparing files for flashing”.
You may have to wait around 60 seconds for the pop-up below to appear. Once it does, you should now connect your Sony Xperia device. Make sure the device is powered off and then hold the ‘volume down’ button whilst connecting the USB cable. Once the pop-up disappears and flashing has started, you can let go of the ‘volume down’ button.

Flashtool will then start flashing your Xperia device.

Once you see “Flashing finished” as indicated below, your Sony Xperia has been successfully flashed.

Congratulations you have just installed Android Marshmallow! Now disconnect your Xperia device and power on the handset. Don’t worry if it takes a while for the handset to boot, this is to be expected.
To confirm that you have upgraded the phone software, click on ‘Settings > About phone’, which will reveal your new Android version and firmware build number.

If you would also like to confirm the region firmware that you have downloaded, you will need to access the service menu option. To do this, open the dialler and enter the following: *#*#7378423#*#*
Then click ‘Service info > Software info’. The CDF is an eight digit number under the “Customization Version” that should tie in with the firmware you downloaded from XperiFirm. For example, you will notice below that the CDF (software customisation version) of 1298-7362 matches the same firmware that we downloaded in the XperiFirm screenshots above.

No comments:
Post a Comment